This is an easy-to-follow tutorial on getting started with Telegram bot programming. It introduces readers to some of the core concepts related to bot programming.
Basic stuff we’ll need beforehand:
- Telegram app and account
- Your favourite text editor
- Working knowledge of PHP coding
- An environment to host a PHP script
1. Register a new bot
- First things first—create our bot in shiny titanium! 😀
- On the Telegram app, search for this bot by the handle of
@BotFather, and start a conversation with it. - Type in
/newbotand send. @BotFatherwill then prompt us to give our new bot a name and a username. We may enter anything that comes to mind as both these values can be modified any time in future.@BotFatherwill then inform us of the details of our new bot:- Two important pieces of info to jot down:
- Our bot can now be publicly accessed at
https://t.me/<your_bot_username> - The secret token for API access (highlighted in red above). It is in the format of a long string containing a colon ‘:’. Do not reveal this to anyone else or they too can control our bot.
- Our bot can now be publicly accessed at
- (Don’t fret if you misplace these info; you can always come back to
@BotFatherand issue the/mybotscommand to find out info about your bots) - From
@BotFather‘s reply, click on the link to our new bot. We’ll be greeted with a screen with aSTARTbutton at the footer; click it to start talking to our bot (but don’t expect a reply from our bot since we’ve not coded anything yet): - There we have it—our new and shiny bot (albeit a quiet one)!


2. Register the bot’s webhook
- Before our bot can respond to messages typed in by users, we first need to inform Telegram of the URL of our backend processing script. This one-time task is known as setting a webhook.
- To do so, we fire off a HTTP GET request to Telegram in this format:
https://api.telegram.org/bot<api token>/setWebhook?url=<our backend script URL>
- For example, if my API token is
123445676:AIEUFEEFE-FUEKKGMVand my intended backend processing script will be hosted athttps://myowndomain.com/mybotscript.php, then my HTTP GET request would be such:https://api.telegram.org/bot123445676:AIEUFEEFE-FUEKKGMV/setWebhook?url=https%3A%2F%2Fmyowndomain.com%2Fmybotscript.php- (Notice that the ‘url’ value in the query string must be url-encoded)
- Enter that HTTP GET request into any browser’s address bar. We should then see a successful response “Webhook was set” from Telegram:
- This effectively means that henceforth Telegram will route all messages typed in by users to our specified backend processing script.
- (Reference: /setWebhook documentation)

3. Set up a skeleton script
- Let’s start writing some codes in the backend processing script that we’ve just registered with Telegram:
    <?php
    // This script must be hosted at the exact URL which we've registered with Telegram in step 2.
    error_log("Request method: ".$_SERVER['REQUEST_METHOD']);
    error_log("Request object: ".print_r($_REQUEST, true));

    $json_string = file_get_contents('php://input');
    $json_array = json_decode($json_string, true);
error_log("JSON payload: ".print_r($json_array, true));- Though simple, this skeletal script will allow us to examine the format of data that Telegram will route to our backend script.
- With the above code written and published, let’s pop over to our bot in the Telegram app and enter some arbitrary message:
- Then switch back to our backend environment and examine the PHP logs. We should see something like:

JSON payload: Array
(
    [update_id] => 44545345
    [message] => Array
        (
            [message_id] => 1
            [from] => Array
                (
                    [id] => 51248244
                    [is_bot] =>
                    [first_name] => Peter
                    [username] => simonpeter
                    [language_code] => en
                )

            [chat] => Array
                (
                    [id] => 51248244
                    [first_name] => Peter
                    [username] => simonpeter
                    [type] => private
                )

            [date] => 1618976079
            [text] => Jejfhf
        )

)- Notice the wealth of information that’s contained in this message.
- In addition to the message text that was sent, we are also provided with the sender’s ID and first name and the timestamp. These allow scripts to respond with personalized replies to the sender.
- Try sending different types of messages (such as images, location, etc.) to the bot and see how each type is being presented in the logs.
4. Sending a message to the user
- Now that our bot is able to receive messages sent by the user, we are going to code the fun part—replying the user!
- Let’s reply the user with a personalized greeting.
- Continuing from the skeletal script that we’ve set up in step 3, let’s append this code snippet:
    $chat_id = $json_array['message']['chat']['id'];
    $friendly_name = $json_array['message']['chat']['first_name'];
    $received_text = $json_array['message']['text'];

    error_log("Chat ID: $chat_id");
    error_log("Friendly name: $friendly_name");
    error_log("Message: $received_text");

    // Compose the reply to be sent to the user.
    $reply = array(
            'chat_id'=>$chat_id, // The chat to send this reply to.
            'text'=>"Hi $friendly_name, thanks for teaching me about <i>$received_text</i>.",
            'parse_mode'=>'HTML', // To render this reply in HTML.
    );

    $ch = curl_init('https://api.telegram.org/bot<api token>/sendMessage');
    curl_setopt($ch, CURLOPT_POST, true);
    curl_setopt($ch, CURLOPT_POSTFIELDS, $reply);
    curl_setopt($ch, CURLOPT_RETURNTRANSFER, true);
    curl_exec($ch);
- Some notes about the code snippet:
- Notice how we can extract useful pieces of information by traversing the JSON array like
['message']['chat']['first_name']. The most important info is the chat ID, which uniquely identifies the chat between a user and our bot. If there are more than one users using our bot, each user will be assigned a different chat ID. It is important that we send each personalized message to the correct user. - The
$replyassociative array conveniently contains the content and nature of the reply to be sent. - Finally, the code invokes the
/sendMessageAPI method via HTTP POST.
- Notice how we can extract useful pieces of information by traversing the JSON array like
- With the code snippet added and published, let’s pop over to our bot in the Telegram app and enter some arbitrary text like: The quick brown fox jumps over the lazy dogs.
- Within a second or two, we should see our bot replying with a personalized message:
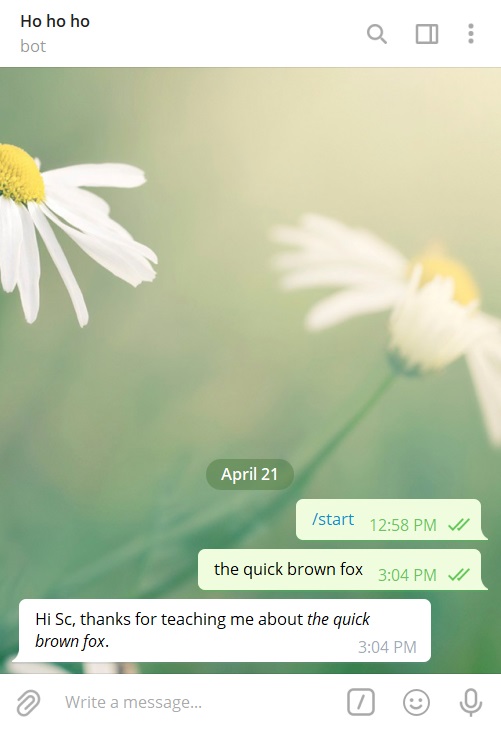
- And with that, our bot has just spoken its very first words!
- (Reference: /sendMessage documentation)
5. Sending an image to the user
- The codes to send an image to the user is largely similar to that of sending a message:
    // Compose the reply to be sent to the user.
    $reply = array(
            'chat_id'=>$chat_id, // The chat to send this reply to.
            'photo'=>'https://i.picsum.photos/id/1018/800/800.jpg?hmac=W6o1FsFZjIEu3gwqLEA7Y2TFCEbGr_bVxZnf2CPmZoE',
            'caption'=>"<i>$received_text</i> makes me think of this photo",
            'parse_mode'=>'HTML', // To render the HTML tags in the caption.
    );

    $ch = curl_init('https://api.telegram.org/bot<api token>/sendPhoto');
    curl_setopt($ch, CURLOPT_POST, true);
    curl_setopt($ch, CURLOPT_POSTFIELDS, $reply);
    curl_setopt($ch, CURLOPT_RETURNTRANSFER, true);
    curl_exec($ch);
- As can be seen above, the only differences are:
- The
$replyarray has been modified to specify information about the image. - The API method has been changed from
/sendMessageto/sendPhoto.
- The
- Once done, let’s send an arbitrary message to our bot again. This time, it should respond with an image and a caption:
- (Reference: /sendPhoto documentation)

And that’s it! Congratulations for completing this tutorial. You have just seen how a bot can be programmed to receive users’ messages and to respond to them accordingly.
In future, I’ll be publishing more posts on how to:
- Display buttons for users to select their choices instead of having them to type out their message.
- Perform batch processing (for example, sending out daily readings at 7am every morning)
Stay tuned! 🙂
